Design & Technology students must be familiar with a range of temporary, permanent and pivoting (rotating) joints for timber or manufactured boards. This article helps students revise this information and concludes with sample examination questions from the Cambridge AS/A Level syllabus.

Advantages of joining timber using temporary joining methods
- Can be disassembled easily storage and transportation (great for flat-pack furniture)
- Creates flexible joints that allows wood to shrink / expand with temperature changes and can accommodate some movement without breaking
- Can often be put together with basic tools (or slotted together without any tools at all) – easier for consumers
- Can be better for environment as fewer components / materials needed and easier to take apart to replace / repair components (less waste)
TEMPORARY JOINING METHODS FOR TIMBER
Slot together
Description
Uses
Nails
Description
Uses
Thin wood can be joined with tiny nails called panel pins (exams sometimes refer to this as ‘pinned’)
Screws
Description
Uses
Nuts and bolts
Description
Uses
Machine screws are like bolts, but have a philips head so they can be driven in with a screwdriver. Like screws but without a pointy end.
Brackets
Description
Uses
Knock-down fittings
Description
Uses
Types of holes (in metal or timber)
Clearance holes are is slightly wider than the item passing through it, so the bar, bolt, pin, or screw to pass through freely without binding (the diameter of the hole is larger than the fastener’s outer diameter). Clearance is the intentional space or gap between two connecting parts or components.
Blind holes don’t go all the way through the material – they have a bottom (if you look inside them they are dark) – so the rod or pin etc cannot pass through it.
Internally threaded holes have thread cut into their interior walls, so something can be screwed in. Threaded holes are originally drilled a bit smaller than the inserting bolt, and then a ‘tap’ is used to cut the threads. (Rods, bolts, or pipes with threads on the outside are cut using a threading die – this is explained in more detail in the article about shaping metal.)
Countersunk hole: a conical or angled recess machined into the surface to fit the head of a countersunk screw.
Counterbored hole: a cylindrical recess machined into the surface around the hole opening. This accommodates hex bolt heads, washers, or other hardware, allowing them to sit below the surface level. Unlike countersunk holes, the recess has straight vertical sides.
Pilot hole: a thin initial hole used a guide. This could be used to drive a screw in straight (and more easily), or to help ensure a large hole is drilled in the right spot.
Advantages of permanent timber joining methods
- More strong and rigid
- Typically more durable
- Can be higher quality items (produced by the manufacturer / maker)
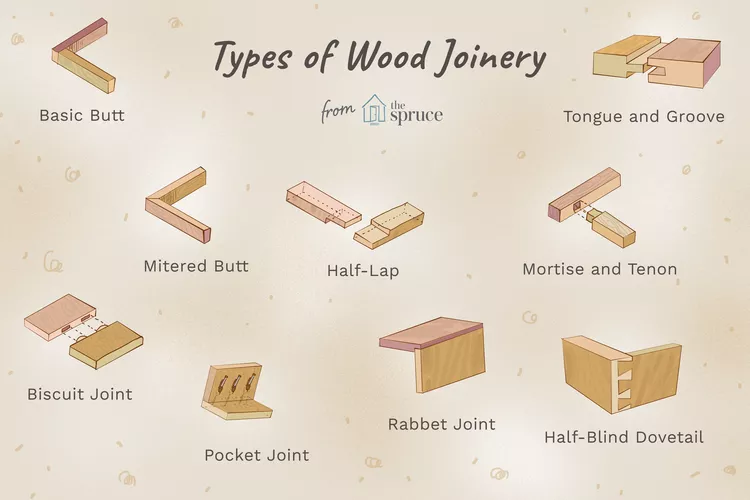
PERMANENT JOINING METHODS
Glued joints
Properties
Uses
When joining timber, bracing and other methods of reinforcing and strengthening structures should be considered.
Pivoting / rotating joining methods
- Bolt with washers and two nuts to prevent vibration undoing it (or can use a custom made locknut, which can have a nylon insert or slightly deformed thread that resists turn). A shoulder bolt, which has a smooth unthreaded part below the head of the bolt is great for this, as the pieces rotate on the smooth area. Rotating pieces need sufficient clearance around shaft of bolt.
- Screw embedded in timber back piece.
- Wooden dowel (can be held in place at each end via friction, wedged into tight hole in timber, with central rotating piece having larger hole so it can move freely).
- Metal hinge attached with screws (for openable doors etc). Often steel, brass, cast iron etc.
- Finger joint with a pin through pieces (like a timber version of a hinge with interlocking timber fingers – common in jewellery boxes etc).
- Wire through hole (suitable for lightweight things like toys or hanging sculptures or mobiles). Wire can be twisted at end to secure in position.
Sample examination questions (AS Design & Technology)


Examiner comment: This question was generally very well answered with marking out, cutting out of panels and joints and construction of the drawer explained clearly with notes and sketches. Tools, equipment, and processes were generally well covered.


Examiner comment: Candidates mostly scored full marks and clearly understood the function of X.


Examiner comment: There were some good answers that detailed a joint; mitre or finger often named, with the process of gaining an accurate corner generally being understood. Many candidates did use technical terms for the tools and equipment that were being used. Safety precautions were not always included.


Examiner comment: Candidates found this question challenging with the need for accurately spacing the joining pieces sometimes being misunderstood. Some candidates used technical terms for the tools and equipment that were being used. Safety precautions were not always included.


Examiner comment: There was a good understanding of the need to accurately mark out and then clamp the pieces of wood together to aid further precision whilst drilling. Tools, equipment and processes were mostly covered well.


Examiner comment: Candidates showed a good understanding of how to match up the aligning slots to ensure the parts were joined.


Examiner comment:
(i) Stronger answers clearly detailed both marking out the position of a corner connector/block and then drilling of the material to accept screws. Many candidates used technical terms for the tools and equipment used. Safety precautions were not always included. Some candidates incorrectly stated joining methods that did not use knock down fittings.
(ii) Candidates gave a wide variety of answers to this question. Detailed answers included the use of grooves or rebates to accept the plywood base as well as the more standard use of screws/pins.
(iii) Candidates often gave good detail in their answers with many responses having sensible processes for attaching the handle. However, some candidates gave answers that were permanent fixings for the handle rather than temporary, as the question required.


Examiner comment: Candidates gave a very wide range of different responses to locking the table at different heights. The majority were sensible ideas and candidates usually scored well.


Examiner comment: Good answers clearly detailed both marking out the position of the pivot and then drilling of the material to accept nuts and bolts or dowel. Many candidates used technical terms for the tools and equipment that were being used. Safety precautions were not always included.


Examiner comment: Generally, this question was answered well and most candidates could state how to attach the hands to the clock. The hands being able to rotate was more of a challenge for some candidates.


Examiner comment: Candidates found it challenging to explain two temporary methods of joining part A to part B.
Stronger answers included adding a rod perpendicular to the tubes so that they could not pull back through the side panels or using plastic end caps. Some candidates gave gluing as a solution, which is not a temporary method.


Examiner comment: Many excellent responses were seen to this question. Solutions for joining the corner of the bookcase included dowel joints, rebate joints, finger joints, mitre joints, dovetail joints and the use of nails and screws. In weaker responses, the sketches and notes only showed the joint, and not the method of making the joint. Where the method of making the joint was shown, this was usually through a series of steps that included details of tools, equipment and processes to be used. Some candidates did not include details of safety precautions to be undertaken during the making of the joint or only included superficial details of the Personal Protective Equipment (PPE) that would be
required, rather than linking the use to a specific stage in the making process.
Note: see a sample answer to this question on the production processes page.


Examiner comment: Many excellent responses were seen to this question. Methods of making the shelf height adjustable were dowels, pegs, slots and a range of brackets. Some candidates focused on making the shelf adjustable to different heights, for example at 150 mm intervals, and others on making the shelf adjustable to any height. In weaker responses, the sketches and notes only showed the adjustment method and not the method of making it. Where the method of making the adjustment method was included, this was usually shown through a series of steps that included details of tools, equipment and processes to be used. Some candidates did not include details of safety precautions to be undertaken during the making of the height adjustment method or only included
superficial details of the Personal Protective Equipment (PPE) that would be required, rather than linking the use to a specific stage in the making process.


Examiner comment: Candidates found being able to show the difference between clearance, blind and internally threaded holes very challenging.


Examiner comment: This was a very well answered question with candidates demonstrating a good knowledge of how to mark out, drill and join Part B to Part C. There were some very good responses that detailed how using a jig or clamping the two parts enabled a more accurate outcome.


Examiner comment: This question was usually answered well with candidates understanding the steps necessary to mark out and fasten the six slats to the cross rails. There were some excellent responses that detailed the use of spacers or a jig to set out the 6mm gap.

Amiria has a Bachelor of Architectural Studies, Bachelor of Architecture (First Class Honours) and a Graduate Diploma of Teaching. She is a CIE Accredited Art & Design and Design & Technology Coursework Assessor. Amiria now teaches Art, Design & Technology at ACG Parnell College.