Cambridge Design and Technology students have to be familiar with how to cut, shape and form plastic using a range of different methods. This article introduces various plastic forming processes, including vacuum forming, blow moulding, injection moulding, line bending and so on, helping students prepare for examination questions on this topic.
Note: A felt pen should be used to mark out plastic as a pencil doesn’t write on plastic easily (the felt pen can be wiped off afterwards – don’t use a vivid or permanent marker as it will leave marks all over the plastic)!
Vacuum forming

- Thin plastic sheet (i.e. PVC) is heated and sucked down around a ‘former‘
- See detailed information about vacuum forming
- Only works for thin plastic and relatively simple shapes
- Commonly used for blister packaging
Shrink wrapping

- Wrap product with plastic film (i.e. PVC or PE)
- Apply heat using a heat gun or pass through a heat tunnel to warm the plastic
- Plastic shrinks and contracts, pulling tight around the product’s shape
- Forms tight protective seal – used as protective packaging – often holds multiple products together
Laser cutting and engraving

- File created using CAD software such as Techsoft Design or Adobe Illustrator (different colour used for cutting and engraving)
- Sheet of material placed in bed of laser cutter, depth set correctly
- Extraction fan turned on
- File sent to laser cutter, ensuring to enter speed and other settings as appropriate for that material according to manual
- Material laser cut / engraved and lifted from bed, removing all scraps and debris
Vinyl cutting
Thin sheets of vinyl can be cut using a vinyl cutter. Learn more about vinyl cutting in the article about cutting lightweight materials.
Blow moulding

- Molten tube of plastic lowered into a mould
- Blow air in through tube, so it inflates and presses against the walls of the mould (like blowing up a balloon)
- Cool and harden
- Open mould and remove
- Creates hollow plastic parts in one piece
- Commonly used for bottles and containers
Injection moulding
Note: Injection moulding appears very commonly in AS exam questions.


- Plastic granules fed into machine via a hopper (funnel-shaped container that sits on top of the machine)
- Plastic pellets pushed through a heating chamber by a rotating screw, melting until liquid
- Molten plastic injected into mould cavity using high pressure (the mould has two halves that clamp together forming an internal cavity)
- Cools and harden inside the mould
- Mould opened to release the part
- Widely used
- Fast production, with consistent quality and accurate dimensions (able to rapidly repeat many products all the same)
- High costs to set up (not good for short runs)
Extrusion

- Plastic granules are fed into machine via a hopper (funnel-shaped container that sits on top of the machine)
- Machine is hot and melts plastic
- Molten plastic is pushed through a die with a shaped metal opening using a rotating screw
- Continuous shape emerges – a long, continuous profile matching the shape of the die (like squeezing toothpaste from a tube)
- Plastic cools and hardens as it moves out
- Cut to length as required
A die is a pre-made metal plate or block that shapes material – sometimes by flowing through it (hole), sometimes by cutting it (sharp edge – i.e. a die cutter), and sometimes by pressing/forming it (solid shaping surface).
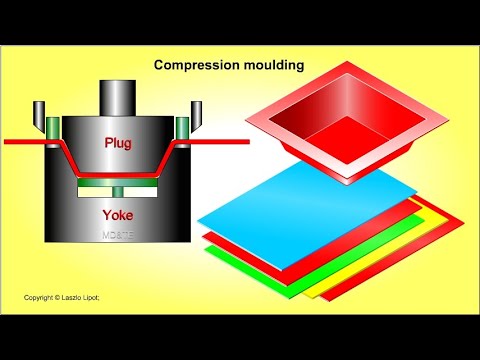
Compression moulding
3D printing

- Create digital 3D model using appropriate CAD software such as Blender
- Save file as STL file
- Slice into layers using software linked to 3D printer such as Bambu Studio and add ‘supports’ as necessary
- Send file to 3D printer which heats plastic filament until molten and prints model layer by layer
- Remove printed item, clean the build plate and remove any support material
A2 students only: Stereolithography (SLA) is a type of 3D printing that uses a UV laser to selectively cure liquid photopolymer resin layer by layer, producing high-resolution parts with smooth surfaces — ideal for detailed work like jewellery or dental models, however it needs more work afterwards (sanding, washing, curing under UV light). Fused Deposition Modeling (FDM) instead melts a plastic filament and extrudes it through a moving nozzle, building objects layer by layer like a precise hot-glue gun; it’s cheaper, cleaner, and the most common technology in desktop 3D printers, but produces visible layer lines and less fine detail.
Line bending

- A strip heater is used to heat the plastic in a line, so that it can be bent (alternatively a blow torch can be used, moving this up and down the plastic in a line) – this heats the plastic just along the line where it needs to bend
- Use a jig and/or former to help bend the item over the edge of a table or around a former, and hold the item in shape while it cools
- Safety precautions:
- Tie back long hair and keep loose clothing away from the strip heater
- Use heatproof gloves
- Do not touch the heating element or the softened plastic directly, and keep hands away from the hot area when moving or positioning the plastic.
- Work in a well-ventilated area, to minimise inhaling harmful fumes
- Do not overheat the plastic (remove it once it becomes flexible, before it bubbles, burns, or gives off smoke)
- Switch off the strip heater after use and allow it to cool before moving or storing it.
- Let the plastic cool fully before handling it or removing it from the former.
Note: A mould has a hollowed out part that is filled (like an ice-block mould), whereas a former has a protruding shape that another material is shaped around (as in vacuum forming). In everyday use, these words are sometimes used interchangeably.

Hot wire cutting
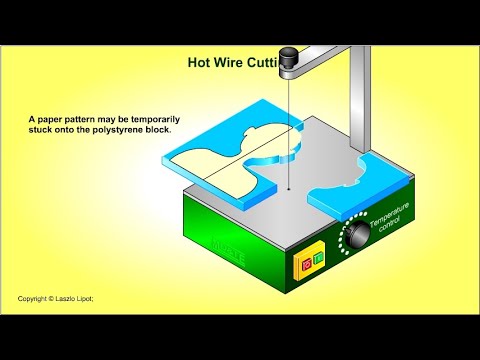
Expanded polystyrene can be cut using a hot wire cutter, but fumes are toxic (forced air-extraction must be used and never do when wire is red-hot, as melts it too much, decomposes, toxic fumes, and fire risk).
Bandsaw or handsaw
- Can be used to cut plastics such as acrylic sheet or Styrofoam sheets (see the article about shaping wood for more information about these tools)
- When cutting acrylic, this makes a rougher edge than cutting with a laser cutter, which then needs sanding (see below).
Manual cutting (scissors or guillotine)
- Only suitable for one-off creations, or very small batches
Wet and Dry sandpaper
- A special type of sandpaper that can be used either dry or wet.
- Often used wet to stop the sandpaper clogging with plastic dust.
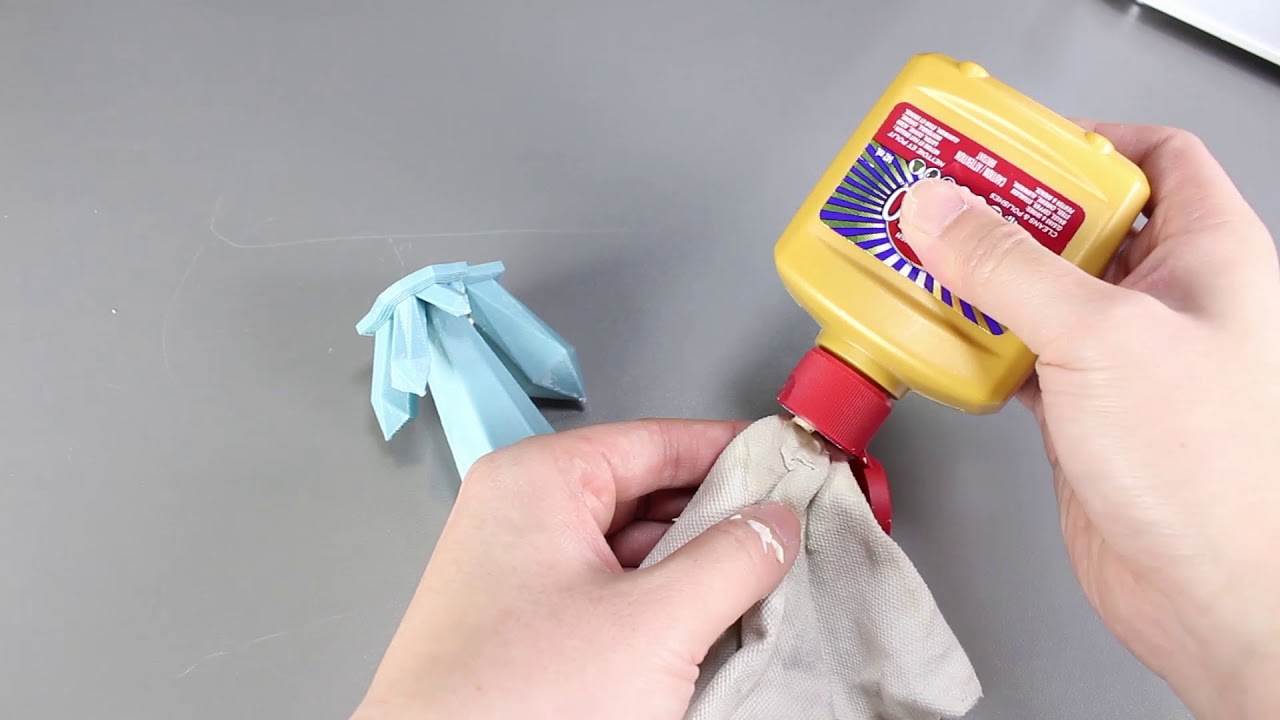
Brasso
- A metal polish (the name comes from “brass”) that you put on a cloth and rub onto metal to clean / polish door handles / instruments / stainless steel items etc (remove oxidation and make them shiny)
- Can be used on cut edges of acrylic to remove fine scratches and make a clear, shiny edge
- Cannot be used on wood as it is oily and stains the surface
- Give the acrylic a professional, transparent appearance
- Typical process: cut the acrylic with the bandsaw → smooth edges with wet and dry sandpaper (progressing through finer grades) → final polish with Brasso to achieve clear, professional-looking edges.
Sample examination questions (AS Design & Technology)


Examiner comment: This question was well attempted with Injection Moulding often very well described. However, many candidates did not explain how to make an end cap 500 times and then could not be awarded credit.


Line bending is the most suitable method for bending a sheet of acrylic to make the menu holder.
Note that it says it must be made in a school workshop and only one is required, so injection moulding is not suitable.
Examiner comment: Candidates offered some interesting ideas on how to make an alternative menu holder from acrylic. However, several responses lacked the detail to fully understand how the idea would be made.


Note: using a laser cutter gives a much more perfect edge than a bandsaw or tenon saw. The question specifies that the item must be made in a school workshop, however many school workshops have laser cutters, so this answer is acceptable. In the case of a laser cutter method, you must describe creating the file in a suitable CAD programme, adjusting the laser cutter settings: depth, speed, and power etc, as well as relevant safety precautions. Brasso could be used to polish edges.
Examiner comment:
(i) Some candidates included detail on how to cut out and finish the edges, with a reasonable understanding of the steps required. Candidates did not always use technical terms for the tools and equipment that were being used. Safety precautions were not always included.
(ii) Candidates found this question challenging. Marking out and cutting was generally fine although the need for accuracy with using a template or one acrylic sheet being placed on top of the other and clamped together before drilling often required further detailed explanation. Tools, equipment, and processes were generally well covered.


Examiner comment: Candidates found this question challenging, with a broad range of processes communicated to make the 50 plastic counters. Often details on tools and equipment were lacking technical language.
Note: Laser cutting from a sheet of acrylic, with the swirl etched on the surface, would be a fast, efficient, and highly precise way of creating the counters.
This product is to be made in a school workshop and is a very small batch, so the mark scheme above appears to contain an error, as injection moulding is not available in most school workshops and is not cost effective for 50 very small, inexpensive items.


Note: Although most schools do not have injection moulding machines, this indeed would be the best method for creating the complex form in a batch of 500 and the examiners appear to accept this method. 3D printing would be another option, however this would be far slower than injection moulding.
Examiner comment: When candidates used a correct manufacturing process, such as injection moulding, and then added detailed technical terms such as hopper, heating chamber, mould cavity and repeatability answers were generally strong. Unfortunately, a number of candidates were unable to give such levels of detail and found the question challenging.


Examiner comment:
(i) Stronger answers clearly detailed both marking out the position of the hole and then drilling of the material. Many candidates used technical terms for the tools and equipment that were used. Safety precautions were not always included. When it was included, clamping the acrylic before drilling and the use of eye protection were correctly given.
(ii) Candidates gave a wide variety of answers to this question. Detailed answers included hand tools, machinery, and CAD/CAM, with some excellent technical details on tools and equipment and how to use them correctly.


Note: Polypropylene is prone to melt, soften, curl, warp, or leave slightly rough/stringy edges when laser cut. Although this method would be much more accurate than cutting by hand, careful testing of settings would need to be carried out to ensure it cuts cleanly.


Note: Although most schools do not have injection moulding machines, the examiners appear to accept this method. Another possible method is laser cutting.


Another possible method is to score lines in acetate, fold, and then attach to the inside of package with double-sided tape.
Examiner comment: All candidates were able to demonstrate how to add a clear plastic cover. In some instances, the method of connecting the cover to the packaging was not feasible.


If a laser cutter was used, two layers for each tray would be needed: a large thin acrylic circle for base of the trap, and a 10mm deep acrylic ring that could be attached to the base with acrylic cement. Holes could be included for hanging. This would be quite heavy, so a vacuum formed HIPS tray would likely be ideal.
Examiner comment: Candidates often gave good detail in their answers with many responses offering vacuum forming. Unfortunately, some candidates gave answers that were not feasible and omitted the need for twelve trays to be manufactured.


Note: Although most schools do not have injection moulding machines, the examiners appear to accept this method. Another possible method is laser cutting.
Examiner comment: Candidates often gave good detail in their answers with many responses offering injection moulding or 3D printing. However, some candidates communicated answers that were not feasible and omitted the need for a batch of 2000.


Note: Although most schools do not have injection moulding machines, the examiners appear to accept this method. Another possible method is laser cutting. In this case, three circles would be needed that are glued together using an appropriate adhesive.
Examiner comment: Candidates gave a very wide range of different explanations of how to make a batch of 1000 of Part B but many found the question challenging. Some candidates gave some very detailed answers on injection moulding, clearly understanding the process very well.


The identical ears could also be laser cut, with a hole for a screw. A screw would be great as it could allow the ears to swing / rotate.
Examiner comment: This was a very well answered question with candidates demonstrating a good knowledge of how to make two identical ears. There were some very good responses that detailed how using a template or clamping the two parts enabled a more accurate outcome. Attaching the ears to the elephant was occasionally not undertaken.


Note that a felt tip pen (rather than a pencil) is needed to mark out Styrofoam. PVA is a suitable glue for Styrofoam (slightly roughening adjoining surfaces before glue is applied also helps to create a secure connection).
Examiner comment: Generally, this question was answered well with candidates understanding how to make the handle from a sheet of 20 mm Styrofoam. Marking out, cutting and finishing techniques were all well communicated but some candidates did not recognise that two sheets needed to be stuck together to give the overall thickness of the handle.


Plaster of Paris can also be used to fill in any imperfections before sanding.
Examiner comment: Candidates had a good understanding of how to smooth the model and apply a paint finish. However, some candidates decided to apply an aerosol spray finish which was incorrect.


Examiner comment: Candidates were able to name a specific plastic for the clip. However, some candidates did not give a suitable process to make a batch of 5000 clips. When injection moulding was given as an answer, candidates tended to score very well indeed.


Cutting the acrylic using a laser cutter (including the two holes), and then line bending around a former with the use of a strip heater is a common method. The joining edges can be connected using acrylic cement.
Examiner comment: Candidates were generally able to explain how to make Part A, with the use of a strip heater for folding up the acrylic housing being regularly stated.


Note: Although most schools do not have injection moulding machines, the examiners appear to accept this method.
Examiner comment: Candidates found it challenging to show how to produce 5000 nylon stoppers. Stronger candidates had a good understanding of injection moulding.


Note that a felt tip pen (rather than a pencil) is needed to mark out Styrofoam. PVA is a suitable glue for Styrofoam (slightly roughening adjoining surfaces before glue is applied also helps to create a secure connection).
Examiner comment: Most candidates answered this well and understood how to mark out, cut, glue, clamp and sand part A. Technical terms for tools and equipment were often clearly identified.


Cutting the acrylic using a laser cutter, and then line bending around a former with the use of a strip heater is a common method. Ensure CAD software is named.
Examiner comment: Candidates gave a wide variety of answers to this question. Stronger answers included marking out, cutting out and then using a line bender to fold the acrylic.

Amiria has a Bachelor of Architectural Studies, Bachelor of Architecture (First Class Honours) and a Graduate Diploma of Teaching. She is a CIE Accredited Art & Design and Design & Technology Coursework Assessor. Amiria now teaches Art, Design & Technology at ACG Parnell College.