This article summarises the topics to revise for Cambridge IGCSE Design & Technology, Paper 1: Product Design (0445/01). This exam involves producing freehand sketches, annotation, and written answers in response to a single design question.

- This paper is 1 hr 15 mins long
- 50 marks are available
- It is worth 25% of your final mark
- Answer ONE question only
Please note: This revision guide prepares you for answering the lightweight materials / graphic products question (typically Question 2). You should also study the revision notes for Paper 5: Graphic Products.
Equipment to bring to the exam
- Pencil sharpener
- HB pencil (plus a backup pencil)
- Eraser
- Colouring pencils
- Black fineliner drawing pens (in case you want to outline some drawings)
- Blue / black pens (for written answers)
- Set squares (these are not needed for Paper 1, as it is a freehand sketching exam, however they can be useful for adding dimensions and checking angles etc)
- Calculator (this is unlikely to be needed in this exam, but it is permitted)
- Note: any standard drawing equipment is allowed in this exam
Exam format and topics to revise for Paper 1: Product Design
These revision notes are based on the common core content in the IGCSE Design & Technology syllabus, which is studied by all students:
Generate specification points
The first question asks you to identify four important points about the function of the product that you consider to be important. You can think of these as specifications.
Answers to this question should include the key point followed by the explanation why (the reason or justification).
For example:
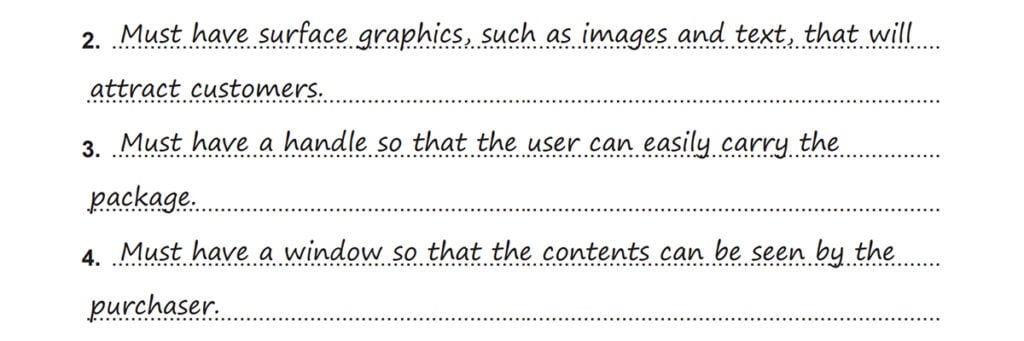
IMPORTANT TIPS
- Do not repeat points that are already stated in the question
- Ensure points are specific to the situation, not generic (i.e. “no sharp corners to avoid causing injury when picked up” ✓ versus “safe” X)
Use notes and sketches to show different design features
This question often asks you to use sketches and notes to show how various joints or design features can be made using lightweight materials.
You should revise:
- Different ways of joining lightweight materials (including permanent joints, temporary joints, rotating, moving, or adjustable joints, and tab-and-slot methods)
- Different types of glue and their common uses
- Names, properties, and common uses of lightweight materials including paper, cardboards, as well as plastics that might be useful in packaging, and materials such as MDF, Styrofoam, and Plaster of Paris that could be used in architectural models.
- Ways of making a product visible in a package (i.e. transparent acetate or PVC windows, vacuum formed covers, openings through which the product protrudes out and is held in place with zip ties, mesh bags)
Sample answer:

IMPORTANT TIPS
- Ensure any materials, parts, or components use precise names where appropriate i.e. acetate sheet ✓ not plastic X.
- For each method, one mark is given for the drawing and one mark for supporting notes or labels, so make sure you include sketches and notes.
- Ensure annotation is brief and clear (not long, waffly sentences)
Generate and sketch three design ideas
In this question, you are asked to generate and sketch three different design ideas. You should prepare by revising and practising:
- Ways of quickly sketching 3D forms, such as using using ‘crating‘ (sketching basic boxes and then adding or subtracting parts) to draw complex forms
- Knowledge of lightweight materials, fixing methods, and construction methods, including ways of cutting and forming plastic (such as vacuum forming or laser cutting), printing methods and surface treatments (including techniques such as dry transfer, laminating, and so on).
Prepare for a range of possible design topics, such as:
- Packaging design (PVC blister packs, cardboard packages, transparent acetate windows)
- Point-of-display stands (these could be made from corrugated cardboard, foamboard, corriflute, or acrylic sheet)
- Board games or activity design
- Cards, including those with moving parts
- Posters, brochures, manuals, or promotional / advertising material
- Logos or branding design
- Light-weight products such as mobiles, slot-together cardboard toys, or carry boxes
- Architectural models (including those showing interior design)
Sample answer:

IMPORTANT TIPS
- Label the concepts (Concept 1, 2, 3, or Idea 1, 2, 3 etc)
- Add annotations briefly explaining materials, construction methods, printing methods, and any other relevant factors
- Ensure any materials, parts, or components use precise names where appropriate i.e. acetate sheet, not plastic, and precise names for glue, such as PVA or UHU
- Include construction methods (such as visible glue tabs, or enlarged details and nets etc as appropriate)
- Add a hint of shading or colour (colour is essential in logo design questions or posters) – you can also use thick and thin line technique (but be careful about pens bleeding through the page)
- There are 12 marks in total for this question – 4 marks per concept (half the marks are for quality of drawings and clarity of notes, and half the marks are for suitability of ideas)
- Spend 18 minutes on this section (6 minutes per concept)
Evaluate your designs
- This means to discuss the good and bad aspects of your design (it doesn’t mean describe your idea)
- Aim to write down at least one pro and con for each concept (if answer is very thorough, they will sometimes accept only pros or only cons)
- Consider function, aesthetics, safety, ergonomics, sustainability, cost, ease of manufacture etc.

IMPORTANT TIPS
- Evaluate does not mean describe! It means to discuss the pros and cons.
- Don’t repeat points (or even very similar points)
- Link comments back to the specifications or requirements of the question
- Ensure comments contain sufficient reasoning. For example, simple comments, such as “it is colourful” X or “it is the smallest” X, would not be awarded a mark. Instead, you could say something like “the vibrant colours would attract the attention of the target market“✓ or “it is environmentally friendly because it is made from card that can be recycled“✓.
- Make sure comments are justified – for example, if you say an idea is stable, say why it is stable (i.e. it has a large base and would not tip over easily)
- When justifying the idea you select, compare it to the other designs and clearly say why it is better. Don’t just say it is the best idea – be specific and say why it is better. For example, “it will be easy to make as it is a one-piece net“✓ or “it will be cheaper to print as it only uses one colour ink…“✓ rather than simply stating “it is the nicest” X
Draw the full solution presenting your chosen idea
In this question you should:
- Do one main drawing of your the final design, fixing weaknesses discussed in the evaluation (you can also merge ideas from multiple concepts). This can be sketched using any appropriate method (i.e. a 3D/pictorial method such as isometric, or orthographic (2D) views – or both)
- Add any further drawings necessary to show construction details, such as enlarged details, nets with score lines and glue tabs, orthographic views, parts lists, sectional sketches, or freehand exploded drawings
- Add at least four dimensions! (Review dimensioning rules here)
- Include notes about shaping, forming, cutting, joining, fitting, assembling, and finishing methods used – make sure it is obvious how the item will be constructed
- Do not write long paragraphs – jot down information clearly in bullet point form etc
- Quickly add some colour and tone, making the drawing look 3D, representing materials and surface qualities

IMPORTANT TIPS
- 4 marks are for quality of drawing
- 2 marks are for dimensions (at least 4 dimensions are needed to get both marks)
- 6 marks are for construction details (don’t spend forever rendering – ensure construction details are clear first)
- Spend 18 minutes on this question
Name and justify selection of materials
This question asks you to name two specific materials used in your solution and to explain why you have chosen these materials.

IMPORTANT TIPS
- Specific material names must be used, i.e. acetate sheet, PVC, polypropylene sheet, acrylic sheet, mount board, card, corrugated cardboard, corriflute, MDF, styrofoam etc (generic names such as ‘plastic’ or ‘wood’ are not awarded marks)
- Reasons for selecting the material should be specific to the material, such as “polypropylene sheet is water resistant so it will not be damaged if the drink is spilt”✓, rather than the more generic “aesthetically pleasing” X
- Note: If your solution is genuinely made from one material, suggest another suitable material that the product could be made from
Use sketches and notes to describe a method of manufacture
In the last question you must use sketches and notes to describe how one part of your design is manufactured. Before answering this question, you should consider whether the product is ‘one-off‘ and made in a school workshop, batch produced, or mass produced in a factory, as this will impact the method chosen (for example, cutting with craft knife is not suitable if you are making 10,000 items). However, unless the question specifically mentions that the product must be mass produced, a handmade method is acceptable.
- Practise drawing sequence diagrams of common production processes, like how to vacuum form something, or how to cut a net out of card.
- Learn the correct names and uses of hand and machine tools and equipment, such as using set square or try squares to achieve right angles; a craft knife, steel safety ruler, and cutting mat to cut out nets; a plotter cutter used to print/cut designs, and the names of appropriate CAD software, such as Techsoft Design V3 of Adobe Photoshop

IMPORTANT TIPS
- This answer is best presented in stages. This could be a step-by-step diagram in stages, or an annotated flow chart with arrows between.
- Show an awareness of correct procedures for marking out, cutting and shaping, assembling/joining, finishing, with quality checks along the way
- Describe correct use of hand and machine tools and equipment, and use correct names for tools and software
- Remember to reference scoring lines with a blunt blade and safety ruler where appropriate
- Include safety procedures and precautions, such as using a safety ruler and cutting matt when using a craft knife, wearing closed toe shoes, and ensuring the blade is retracted when not in use
- Demonstrate an understanding of sustainability, such as positioning nets near the edge of sheets, rather than the centre, to avoid wastage
- It can be a good idea to label the process with a heading at the start, so the examiner is clear what process you are describing
Reminders: Monitor time carefully. You should spend approximately 18 minutes on the concepts (6 minutes per concept) and 18 minutes on the final solution.
NAME BOTH SHEETS OF YOUR ANSWER PAPER!
Don’t forget to revise for Paper 5: Graphic Products too!

Amiria has a Bachelor of Architectural Studies, Bachelor of Architecture (First Class Honours) and a Graduate Diploma of Teaching. She is a CIE Accredited Art & Design and Design & Technology Coursework Assessor. Amiria now teaches Art, Design & Technology at ACG Parnell College.