Design & Technology students must understand how to mark out, cut, drill, and shape timber. This article summarises basic woodworking tools, methods, and practical techniques. It concludes with sample examination questions from the Cambridge AS/A Level syllabus.

How to mark out wood
Marking out means to carefully measuring and drawing the required shapes on materials ready for cutting. This usually requires taking dimensions from a ‘working drawing’ (an orthographic drawing showing multiple views, drawn accurately to scale).
WOODWORKING TOOLS FOR MARKING OUT
Carpenter pencil
Description
Uses
Marking knife
Description
Uses
Marking awl
Description
Uses
Dot/centre punch
Description
Uses
Steel ruler
Description
Uses
Tape measure
Description
Uses
Try square
Description
Uses
Mitre square
Description
Uses
Description
Uses
Mortise gauge
Description
Uses
Carpenter’s dividers
Description
Uses
Calipers
Description
Uses
Stencils and templates can also be used to improve quality control when more than one product (such as small batch production) or multiple identical parts are needed.
CAD software can also be used to mark out shapes, when using CAM methods.
Cutting, drilling, and shaping timber
WOODWORKING TOOLS FOR CUTTING
Cross-cut saw
Description
Uses
Tenon saw
Description
Uses
Coping saw
Description
Uses
Fret saw
Description
Uses
Scroll saw
Description
Uses
Bandsaw
Description
Uses
Circular saw
Description
Uses
Drop saw
Description
Uses
This is similar to a radial arm saw, in which the blade is attached to an arm that can extend out and pull across the wooden board/sheet, which stays motionless.
Panel saw
Description
Uses
Laser cutter
Description
Uses
CNC router
Description
Uses
Planar thicknesser
Description
Uses
WOODWORKING TOOLS FOR SHAPING
Sandpaper
Description
Uses
Orbital disc sander
Description
Uses
Belt sander
Description
Uses
Rasp
Description
Uses
File
Description
Uses
Chisel
Description
Uses
Hand Plane
Description
Uses
A common all-purpose woodworking plane is known as a jack plane.
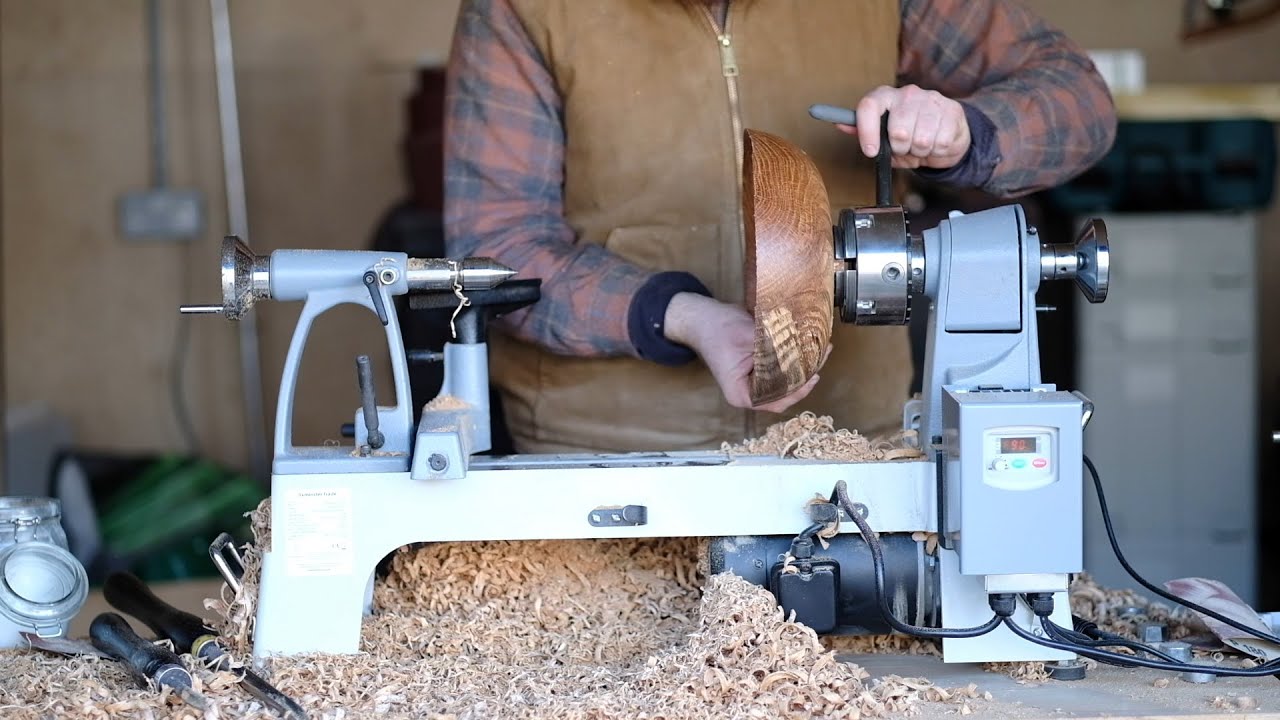
Wood lathe
Description
Uses
Check wood spins freely by hand before switching on lathe; wear eye goggles to protect from wood chips; get training before use; ensure hair tied up and all loose clothing removed.
A woodworking lathe in action:
DRILLING TOOLS
Drill bits
Description
Uses
An HSS drill bit is a High-Speed Steel drill bit (the most common kind for ordinary drilling)
Hand drill
Description
Uses
Electric drill
Description
Uses

Drill press
Description
Uses

Note: a CNC router can also be used for drilling.
Timber forming methods
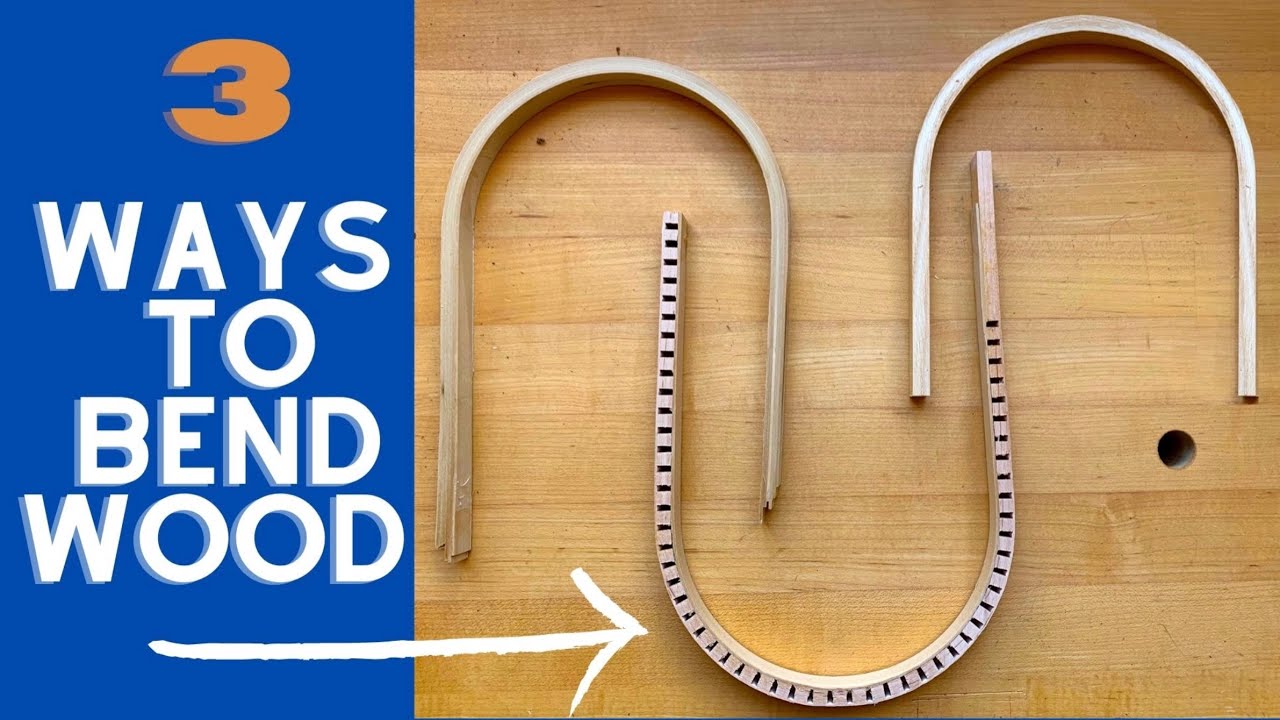
TIMBER FORMING
Steam bending
Description
Uses
Cold bent lamination
Description
Uses
Kerfing
Description
Uses
Segmented construction
Description
Uses
Wastage vs Additive processing techniques
Wastage processing techniques (as opposed to additive methods) involve starting with a larger piece of material and removing (cutting away) portions to create the final shape. The removed material becomes “waste” or “wastage.” Cutting, sanding, and drilling are all wastage methods.
Additive manufacturing methods build up the final product by adding material and joining pieces together (most products involve wastage and additive methods). Laminating and steam bending are additive methods.
When bending timber you often need to create a former and jig to help hold and shape the item while it dries.
Methods for holding/supporting timber:
Jig: a custom-made tool or device to guide the motion of another tool or hold a workpiece in a specific position while making it. Jigs help to ensure consistency when repeating a processes multiple times. For example, a drill jig might be used for precise placement, or to help hold timber while bending around a mould.
Former: an object that provides a solid form that other materials are shaped around or over (like a mould, except that a mould has an internal cavity). For example, a former is used to vacuum form PVC sheets, or to bend and laminate timber around to create consistent curves or shapes.
- G clamps/cramps
- A woodworking vice
- Bench-hook
- Sometimes by hand, such as a piece of timber resting on a sawhorse
A few thin pieces can be taped together and cut at once when multiple identical pieces are needed.
Sample examination questions (AS Design & Technology)


Examiner comment: Many candidates answered well including lots of detail on how to mark out, cut out and finish the external and internal shape of the front panel. Candidates used technical terms for the tools and equipment that were being used although safety precautions were not always included.


Examiner comment: Candidates were well prepared for this question with numerous responses giving detailed answers with excellent technical details on tools and equipment and how to use them correctly.


Examiner comment: Most candidates understood that marking out the holes equally spaced was important to aid cutting out accurately. Some candidates used technical terms for the tools and equipment that were being used. Safety precautions were not always included.


Examiner comment: There was a significant amount of detail included in lots of responses with clear explanations of the planks being cut and then planed being well understood. Safety precautions were not always included and on occasion generic responses simply added the wearing of gloves when it was not actually necessary or helpful to the process or safety of the user.


Candidates often gave good detail within their answers and many responses had sensible processes for joining the vertical planks together accurately.


Examiner comment: There was a significant amount of detail included in lots of responses with clear explanations of how the triangles would be marked out, an access hole drilled and then either a jig or similar type of saw used to cut out the internal shapes. Finishing of the edges was not always clear. Safety precautions were not always included and sometimes generic responses simply added in the wearing of gloves when it was not actually necessary or helpful to the process or safety of the user.


Examiner comment: Candidates gave clear explanations of either using a template, marking out and cutting out with traditional methods or the use of CAD/CAM. Safety precautions were often included.


Examiner comment: There were some clear explanations of either using a template, marking out and cutting out with traditional methods, such as a lathe or the use of CAD/CAM. Safety precautions were not always included.


Examiner comment: Stronger answers clearly detailed both marking out, cutting out and then finishing the clock face. There were some excellent examples of making the clock face with hand tools as well as CAD/CAM. Many candidates used technical terms for the tools and equipment used. Safety precautions were not always included.


Examiner comment: Stronger answers clearly detailed marking out, cutting out and then finishing the set of 80mm diameter holes. Many candidates used technical terms for the tools and equipment that were used.
Safety precautions were not always included. However, some candidates misunderstood the question and used recycled card for the side panels rather than plywood.


Examiner comment: This was a very well answered question with candidates demonstrating a good knowledge of how to mark out, cut out, sand and then drill the central hole in the beech base.


Examiner comment: Generally, this was answered well. Most candidates could explain why the hole in the elephant was drilled before the body was cut to shape.


Examiner comment: Stronger answers clearly detailed marking out and drilling the hole in Part A. Many candidates used technical terms for the tools and equipment used with many excellent diagrams. Safety precautions were often included.


Examiner comment: Stronger answers clearly detailed marking out, cutting, whether by hand or with a machine, and sanding the slats. Many candidates used technical terms for the tools and equipment used. Safety precautions were often included. However, some candidates did not include any details on creating the chamfer.


Examiner comment: Generally, this question was quite well answered with candidates understanding the steps necessary to mark out and machine the body. Those candidates who understood the use of the wood lathe scored well.

Amiria has a Bachelor of Architectural Studies, Bachelor of Architecture (First Class Honours) and a Graduate Diploma of Teaching. She is a CIE Accredited Art & Design and Design & Technology Coursework Assessor. Amiria now teaches Art, Design & Technology at ACG Parnell College.