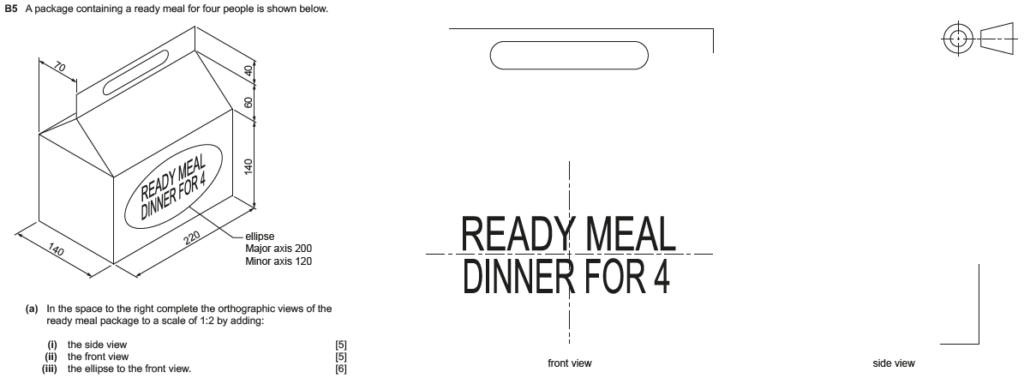
Orthographic drawing is a planar drawing method that shows shows 2D ‘views’ of the object from different angles. It is a technical drawing method that is usually drawn to scale and may include dimensions.
Common views are:
- Plan view (view from above)
- Front view (if unclear which is the ‘front,’ select the largest or most complicated view)
- End views (view from sides)
- Sectional views (views showing what an item looks like when sliced or cut away)
These views are separated by ‘reference plane’ lines. Reference lines should be drawn as long dash, two short dashes.
First Angle or 3rd Angle Orthographic Projection
There are two main types of orthographic drawing: first angle and third angle.
- First angle: has top view below the front view, and the right side view placed to the left of the front view (illogical layout);
- Third angle: has the top view above the front view, and the right side view on the right (logical layout).

The orthographic drawing symbol tells you which method is used (it is a tiny orthographic drawing of a truncated cone – a cone with its top chopped off).
NOTE: Because Cambridge is an international exam, either type may be referenced. Designers need to be familiar with both systems to work effectively in global contexts.

Sample exam questions (IGCSE Paper 5)


Note: See how to draw an ellipse here.
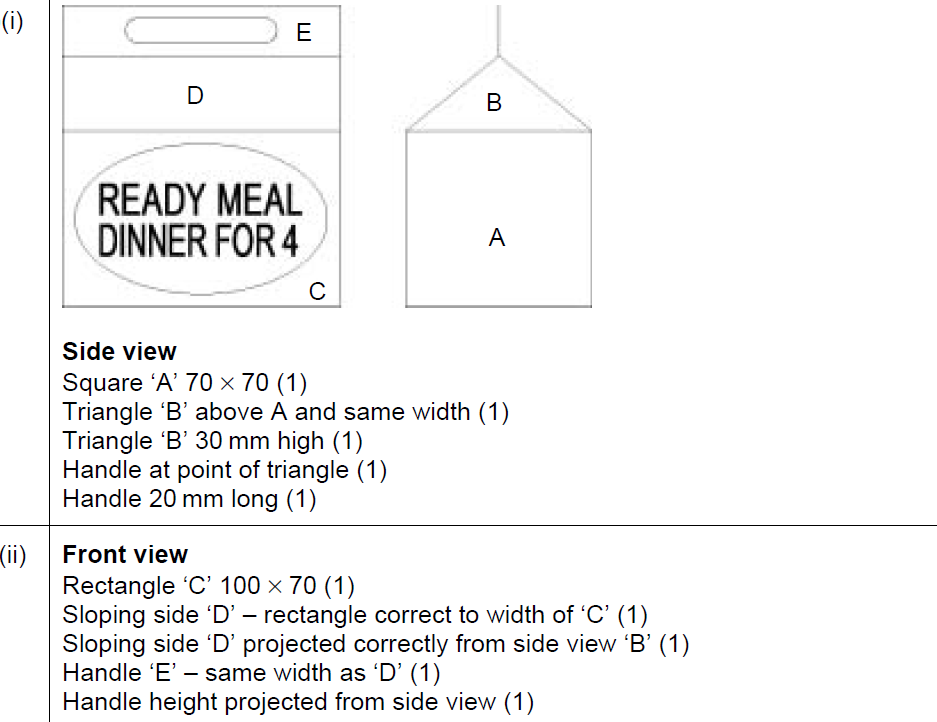
Examiner comment:
(i) This part of the question required candidates to draw the side view of the box. Many candidates achieved full marks for this but the accuracy of some responses was not strong.
(ii) This part of the question required candidates to complete the side view of the ready meal box. Candidates who projected the front view from the side view achieved the best results.
(iii) Candidates were required to construct the ellipse. Many candidates did not achieve full marks on this question. Some candidates used incorrect construction methods or joined the plotted points of the ellipse with straight lines rather than a smooth elliptical shape Where a trammel is used for constructing an ellipse, this must be attached or drawn adjacent to enable marks for construction to be awarded.
