This article helps high school Design & Technology students familiarise themselves with printing methods and surface treatments suitable for use in graphic products, as well as ways of applying images to other products, including engraving, stickers, and stencils. It concludes with sample examination questions from the Cambridge IGCSE and AS/A Level syllabus.
PRINTING METHODS
Digital Printers
Description
Uses
Plotter printers
Description
Uses
A plotter cutter prints and cuts. See more ways to cut paper and card.
Letterpress printing
Description
Uses
Flexography
Description
Uses
Offset lithography
Description
Uses
Gravure
Description
Uses
Photocopying
Description
Uses
Stencil
Description
Uses
Screen printing
Description
Uses
Block printing / lino cut / wood cut
Description
Uses
Dry transfer
Description
Uses
These are like rub-on stickers
Sublimation printing
Description
Uses
A2 students only
Sublimation = when a solid transforms into a gas without becoming liquid first
UV printing
Description
Uses
Pad printing
Description
Uses
A2 students only
Types of surface treatments used for paper and card
SURFACE TREATMENTS
Embossing
Description
Uses
Laminated layers
Description
Uses
Lamination = thin layers bonded or glued together
Laminating machine
Description
Uses
Varnish
Description
Uses
Varnish is also commonly used to finish wooden products
UV lacquer
Description
Uses
Note: some students mistakenly think UV lacquer protects against UV light, but instead it cures/sets using UV light.
Hot foil blocking
Description
Uses
This process is also known as hot foil stamping
Why surface treatments are used in graphic products
- Protection against physical damage (i.e. UV lacquer can make a book cover more resilient, extending lifespan – better for the environment, as fewer replacements needed / less waste)
- Moisture resistance (food packaging often incorporates water-resistant lamination / PE coating to maintain structural integrity and prevent deterioration when exposed to condensation or spillage – can also allow a surface to be wiped clean, or written on with a whiteboard marker and wiped-off)
- Food safety compliance (can help to ensure packaging meets food safety regulations, with food-grade coatings, such as a PE coating, creating barriers between food products and printed materials, preventing ink migration and contamination)
- Enhanced visual appeal (decorative finishes such as strategic use of matt and gloss finishes or metallic foil can make a product look expensive / appealing)
- Improved tactile qualities (these not only stimulate interest, but can provide important cues for visually impaired users)
- Chemical resistance (protecting against chemical exposure or staining from spills)
Engraving methods
Engraving is when a pattern or writing is cut into (engraved) into a surface. Unlike embossing, where the design is pressed in, an engraved design is cut out of the surface. This could be achieved with:
- CNC engraving machine (a basic version can be seen in pet shops, when you buy tags for dog collars etc) – these have a small, rotating cutting bit that moves to cut the letters in the chosen style selected on the computer screen.
- Laser cutter (different coloured lines can be set to engrave, adjusting power and speed settings accordingly, so the laser cutter just partially cuts into the surface, rather than cutting the whole way through). This is the most common method of engraving in a school workshop.
- Hand-held engraver (this is a vibrating electric tool with a pointed tip, which is simple to use but far less precise – used for naming things rather than professional engraving)
Colour separation during printing
A2 students only
Different printing methods have different ways of applying colour. For example, single colour printing involves using just one colour ink. Digital inkjet printing, on the other hand, applies all colours simultaneously. However, many traditional printing methods, like offset lithography, screen printing, and flexography, apply coloura individually.
Colour separation is the process of breaking down a full-color image into individual color components so each can be printed separately.
In CMYK printing, an image is divided into 4 separate layers – cyan (blue-green), magenta (pinkish-red), yellow, and black. These are the subtractive primary colours + black, which can be combined to make all the other colours. Each color is applied one layer at a time in precise alignment (tiny dots that overlap each other slightly). When these overlap and combine in different amounts, they create all the other colors you see in the final image. Instead of printing “green” the printer lays down cyan + yellow in the same spot, and your eye sees green.
Without colour separation, printers would need a separate ink pre-mixed for each color in the image, which would be impractical and expensive.
Advantages of colour separation during printing:
- Enables full-color printing using just 4 inks (Cyan, Magenta, Yellow, Black)
- Cost-effective for reproducing thousands of colors
Disadvantages of colour separation during printing:
- Requires precise alignment of each colour layer – misregistration causes blurry or offset images
- Difficult to match certain vibrant colors (bright oranges, greens, metallics)
- Can be colour variations between what you see on screen and final print (because screens use RGB colours – represented by mixing red, green, and blue light)
Sample examination questions (AS Design & Technology)


Examiner comment: There was a significant amount of detail included in lots of responses with candidates clearly understanding how to produce the image and lettering. Tools, equipment, and processes were generally well covered. Safety precautions were often not added.


Examiner comment: This was generally answered well with stencils, templates and various printing processes often described to add the wording. CAD/CAM was used to good effect within the design of the wording and application. Candidates used technical terms for the tools and equipment that were used but safety precautions were not always included.
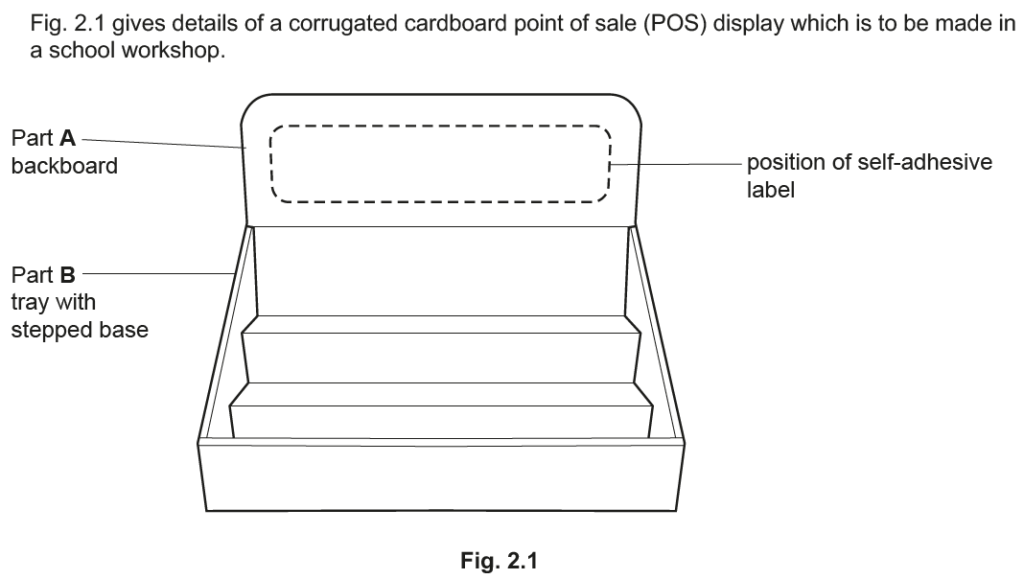


Examiner comment: Candidates generally had a thorough understanding of how to make a label on a computer and then print onto a self-adhesive label.


Examiner comment: Candidates often gave good detail within their answers with many responses having sensible processes for personalising the key fob. CAD/CAM and hand techniques were clearly detailed.


Examiner comment: All candidates were able to demonstrate how to add text to the card closure but some found it challenging to communicate how to reproduce this to be scaled to a batch of 1000.


Examiner comment: Candidates gave a wide variety of answers to this question. Detailed answers included the use of CAD to create the pattern with the application of a protective plastic covering as a waterproofing solution.


Examiner comment: Candidates gave a wide variety of answers to this question. Detailed answers included the use of CAD to design the numbers and then a vinyl cutter to make them before sticking to the plastic shapes.


Examiner comment: Candidates gave a wide variety of answers to this question. All candidates could describe how to put a label that could be updated with information on the box. However, many candidates omitted the method of designing and making the label.
Fig. 10 shows three cartons which are used to hold fruit juice. The cartons are made from card which has been laminated with polythene.
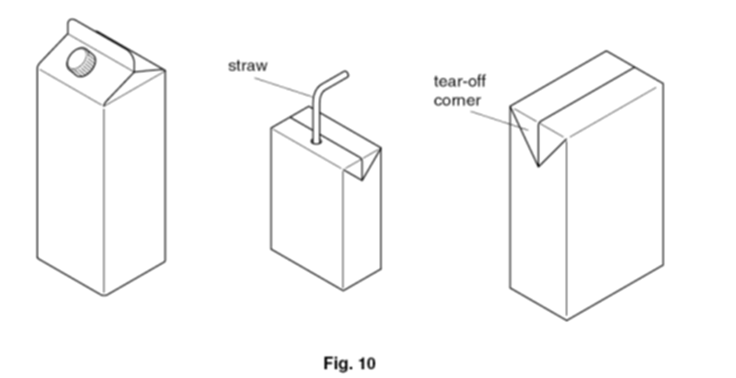
Explain why the card has been laminated with polythene. [2]
Explanation (0-2) e.g.
- To make the card waterproof (so it doesn’t leak or become soggy)
- To provide a more hygienic internal surface, so it doesn’t absorb the juice
The following box is made from card which has been coated with UV lacquer. The box has one opening flap.

Give two reasons why an ultraviolet (UV) lacquer has been applied to the box. [2]
Gives shiny surface (aesthetic improvement)
Protects surface.
Any two relevant answers (2×1)
Examiner comment
Very few correct answers were seen. Many candidates thought that ultraviolet lacquer would prevent the tape from being damaged by ultraviolet rays from the sun. Correct answers needed to explain that the application of the lacquer protected the card by giving it a very smooth, high gloss finish


Examiner comment: Candidates had a good understanding of how to make and apply the monochrome sticker. The use of various design packages to design on computer and then print in batches was a very popular response.


Examiner comment: Candidates had a good understanding of how to make the paper label and attach it to the package. The use of various design packages to design on computer and then print in batches was a very popular response.


Examiner comment: Candidates had a good understanding of how to make fourteen identical stick-on paper windows with CAD/CAM often used. Occasionally candidates did not design the graphic on the windowpanes.

Examiner comment: Candidates gave a wide variety of answers to this question. Stronger candidates either made a stencil or clearly explained how to measure and mark out the even spacing of the fourteen windows. However, some candidates did not give such levels of detail and found the question challenging.


Examiner comment: Candidates had a reasonable understanding of how to make and apply the self-adhesive vinyl characters including the use of tools and equipment as well as CAD/CAM. Safety precautions were often omitted.


Examiner comment: Several candidates did give good detail within their answers with CAD/CAM for either engraving or adding lettering generally well understood.
Note: Engraving with the laser cutter or using UV printing are excellent options.

Amiria has a Bachelor of Architectural Studies, Bachelor of Architecture (First Class Honours) and a Graduate Diploma of Teaching. She is a CIE Accredited Art & Design and Design & Technology Coursework Assessor. Amiria now teaches Art, Design & Technology at ACG Parnell College.